
Tips for Excel, Word, PowerPoint and Other Applications
A Quick Overview of Excel's Drawing Toolbar
Why It Matters To You
While you might think of PowerPoint as the de facto drawing and presentation application, you can actually find many of the same drawing and autoshape capabilities in Excel. While I wouldn't necessarily recommend relying on Excel to create complex art, there are times when you might need to jazz up your spreadsheets a little.
Adding the Drawing Toolbar
Let's start out by finding the Drawing Toolbar. Go into your Main Menu: View: Toolbars, and then click on Drawing.
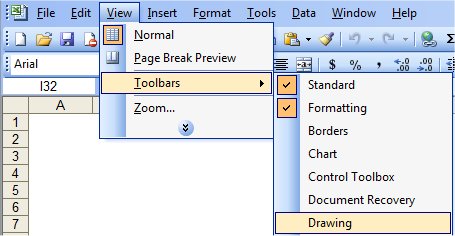
You should end up with this toolbar on your screen, which you can simply drag this up or down dock. I like to keep mine on the bottom of my Excel window.

The Drawing Toolbar
Because the Drawing Toolbar in Excel is basically the same as the one in Powerpoint, I'm just going to reference the same graphic I put together for my Intro To Powerpoint article. A couple of the options are a little different, but for the most part, the toolbars are the same. If you understand Powerpoint, you'll understand Excel.
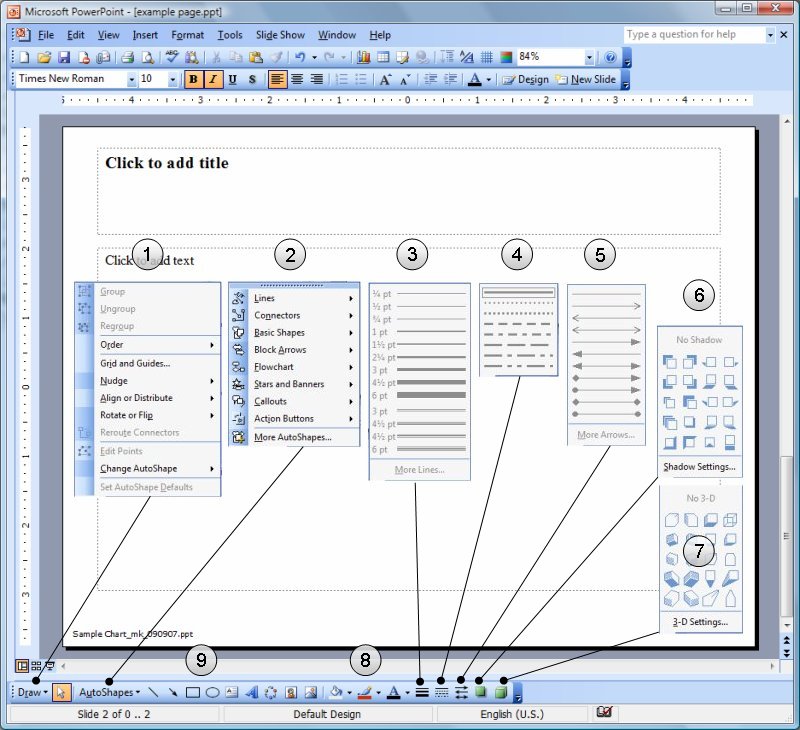
- Draw. Draw should really be though of as "manipulate". Once you have an item, the options in Draw will let you flip, rotate, nudge, align, snap-to-grid, or arrange by layer and of your page elements.
- Autoshapes. Use this to draw any non-chart, non-table, or non-text item. There are autoshapes for your basic geometric shapes, special use items like call outs, stars, and banners, as well as all of your line tools. If you need guidance on how to make basic shapes, I've written up a quick outline below.
- Line Width. This option lets you set the thickness of your lines.
- Line Styles. This section lets you set the style of your line. You can make them solid, dashed, dotted, etc.
- Arrow Styles. There are a number of default arrows styles, but if you need something more specific, click on the More Arrows and you can somewhat customize the starting and ending arrow styles as well as the size and shape of the arrow.
- Shadows. I don't use shadows much, but this is where you would enable and modify them. Just remember that shadows require your object to have a fill. Typically, I only use shadows for backer boxes.
- 3-D settings. I use these even less than shadows.
- Fill, Line, and Font color chooser. If you want to change the color of your fills, lines, or text, you'd use these three buttons. Within the Fill options, you can also choose blended transitions and set transparency levels, which can be quite useful.
- Standard shapes and Text Boxes. These list the most common standard shapes most people need.
Creating Basic Shapes
To create a basic shape, select an AutoShape and your cursor will change into a cross. Go to your insertion point, click and hold your left mouse button, drag the bounding box to the size you want, and then let go. For the sake of illustration, I've kept the cell grid showing.
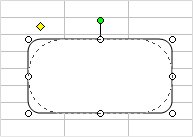
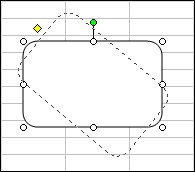
I'll start with a rounded box. If you click on a draw shape, you will see your bounding box with white balls (grab handles) at the corners and on each edge. Grab these to resize an object.
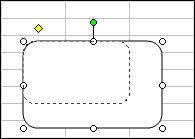
Some objects have a yellow grab handle. This allows you to change the shape of an item like a cross or an arrow. Grab this the same way you'd resize an object and play around with it a bit.
Lastly, you might see a green grab handle. This allows you to rotate an object. If your object doesn't have this, you also find the rotation tool in Draw: Rotate or Flip: Free Rotate.
If your interest in the Drawing Toolbar is now piqued, remember that you can also further customize the toolbar by going to the Main Menu: Tools: Customize: Commands tab and drag specific commands out of the Draw or AutoShapes menu onto the main toolbar.
Controlling The Shape and Placement of Your Shapes
You may not want to freehand the size and shape of your shape. In Excel, you might want your shape to conform to the cell grid. Luckly, there are a number of tools to help you with this:
- If you hold down SHIFT while first describing an object, you'll be able to resize the object but keep the same proportions. Select the type of shape you want to insert, hold down SHIFT, and then use your mouse to define the object.
- If you hold down SHIFT after a shape is already defined, then you'll limit yourself to resizing on the horizontal axis-only, vertical axis-only, or proportional resizing, depending on what grab handle you use.
- If you hold down ALT while resizing an object, your shape will snap to the closest cell border. This also means that you can resize row heights and column widths a bit to provide the sizing you want.
- If you hold down CTRL and then select an object, you'll make a copy which you can then drag to another location. If you've grabbed a grouped object, you'll make a copy of the whole group.
- Not surprisingly, If you hold down CTRL + ALT and then select an object, you'll make a copy which will snap to cell borders when you drag it to another location. This is nice if you're creating a large number of similar objects, perhaps for an org chart.
Not surprisingly, these controls work in PowerPoint and Word. In PowerPoint, ALT will make your shapes snap to the grid, at whatever size your grid is set to. In Word, ALT will make your shape snap to the ruler, in 1/8 inch increments.
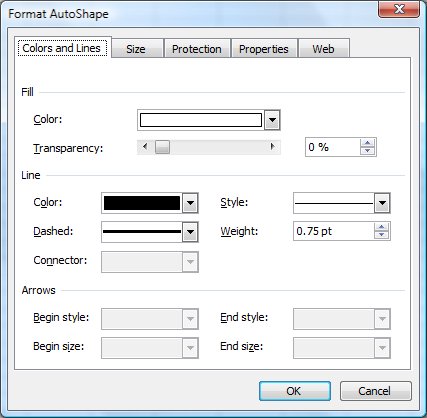
AutoShape Properties
Just a couple of notes on additional properties you can adjust. Select a shape, right click, and the select Format AutoShape. The first tab will be Colors and Lines. You can use this to define the Fill, Line, and Arrow style of your shape.
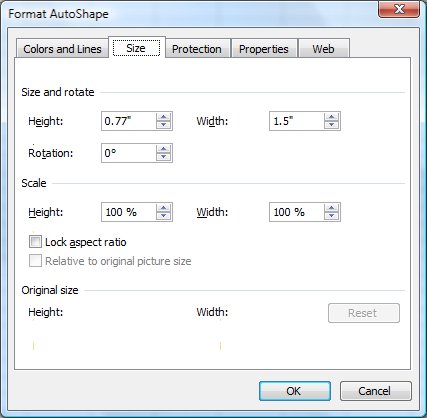
The second tab is Size. You can use this to resize your shape without having to manually guess, as you would if you were resizing it via the grab handles. You can specify the resize based on actual dimensions or you can specify resize based on a percentage of the original. If you want to final shape to retain its aspect ratio, make sure you check the Lock Aspect Ratio box. All of these are very useful.
Notes
| Last updated | 5/29/08 |
| Application Version | Excel 2003 |
| Author | Michael Kan |
| Pre-requisites | None |
| Related Tips | Fill Colors |