 The Quick & Dirty Network for Macs & PCs
This page assumes that every machine on the network already has Ethernet installed. If your computers don't have Ethernet, they should. See my page on Ethernet hardware for details on how to install Ethernet.
Macs should be running System 7 or later, and Wintels should be running Windows 95 or 98.
Once all machines are configured, enable file sharing and run FTP or HTTP servers from all machines. FTP and HTTP clients should then be able to access and transfer files to any machine running the corresponding server.
You will also need to have AppleTalk and the associated FileSharing pieces installed if you want to serve files from your machine. These are available as a part of the Network Software Installer package, also available from Apple.
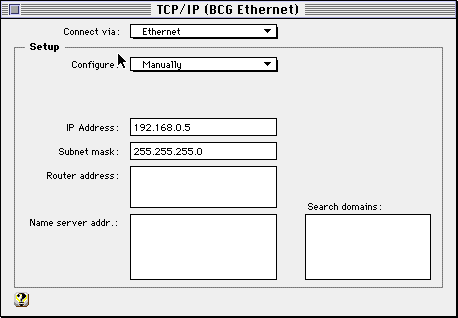
 | With your new configuration active, make sure Connect via: is set to Ethernet and Configure: is set to Manually. Set the Subnet Mask to 255.255.255.0 In the IP Address box, type an address in the following range: 192.168.0.x where x is any number between 1 and 254. Make sure all machines on the network have different numbers for x. Addresses in this group (192.168.0.x) are reserved, and are therefore ignored by routers, gateways, etc. You can ignore the settings for router, name server addr, and search domain. Close the control panel and click Save to save your the settings to your new configuration file. You can now switch between Ethernet and Dial-up networking using the Configurations option in the File menu of the TCP/IP control panel, or via one of several Control Strip modules that are available. |
 |
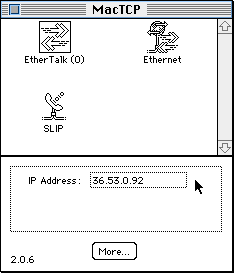
Before you change anything, write down your current settings. Click on the More button and write down every number and radio button setting you see. Go back to the MacTCP Control Panel, select the Ethernet icon, and click the More button. Choose the Set Address Manually radio button, and on the right side of the dialog box, select Class C address, then click OK. In the IP Address box, type an address in the following range: 192.168.0.x where x is any number between 1 and 254. Make sure all machines on the network have different numbers for x. Addresses in this group (192.168.0.x) are reserved, and are therefore ignored by routers, gateways, etc. You can ignore the settings for router, domain name server, and search domain. Reboot. Remember, in order to switch between Ethernet and dial-up networking (i.e. via SLIP, PPP, or AOL) you'll have to re-enter all the settings in MacTCP and reboot. This is one very good reason to upgrade to Open Transport, which allows you to save configuration sets and to switch among them without rebooting.
|
 |
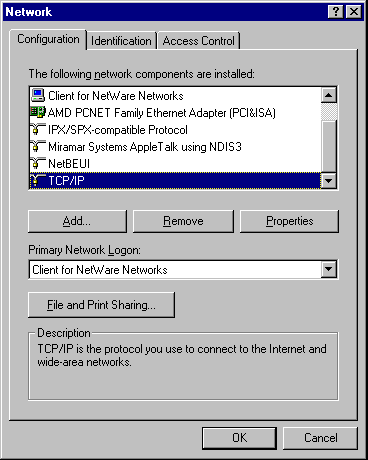
Make sure TCP/IP is installed for your network adapter. To check, go to Start:Settings:Control Panels and open the  that says TCP/IP. If there isn't, click Add . . . , add a Protocol, select Microsoft as the vendor, and select TCP/IP. Click OK, let Windows do its thing (make sure your Windows95 CD is in the drive), and reboot when prompted. that says TCP/IP. If there isn't, click Add . . . , add a Protocol, select Microsoft as the vendor, and select TCP/IP. Click OK, let Windows do its thing (make sure your Windows95 CD is in the drive), and reboot when prompted.After you've got TCP/IP installed, go back to the Network control panel, and click on the TCP/IP protocol icon. If you have both a modem and a Ethernet card installed, you will probably see two TCP/IP icons. One of them should read, TCP/IP Dial-up Adapter. That's the one for your modem. Click on the other one, and then click the Properties button. |
 |
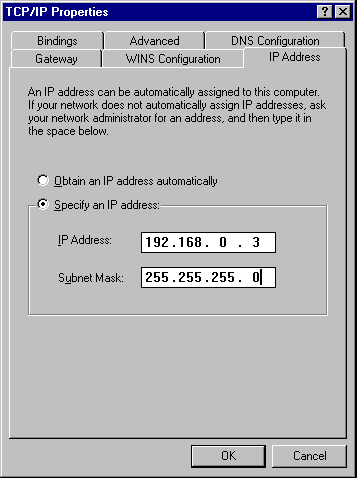
Click the IP Addres tab, click the Specify an IP Address radio button, and type in an address in the following range: 192.168.0.x where x is any number between 1 and 254. Make sure all machines on the network have different numbers for x. Addresses in this group (192.168.0.x) are reserved, and are therefore ignored by routers, gateways, etc. Assign a Subnet Mask of 255.255.255.0 You can ignore all the other tabs. Choose OK, and reboot when prompted.
|
There are several good ping apps for the Mac, and one with a sense of humor is MacTCP Watcher, which is $10 shareware and a really good piece of software to have around.
On the PC side, you can use the $37.50 shareware WS Ping Pro Pack or just use the built-in DOS program.
First, ping each machine from itself. You can either use the machine's assigned IP address or else a the special "loopback" address of 127.0.0.1. The latter is preferable, since you don't have to worry about getting it wrong!
After you've pinged yourself, ping the other machine. If all or most of your pings return successfully, then you'll know that the hardware and TCP/IP stuff is working OK.
If you only need "pull" capability (i.e. all you need to do is log into the other machine and get files; you don't need to push/put files onto the remote machine), then you can use the included servers and spend nothing at all. The Mac version is called Personal Web Sharing, and is included with Mac OS 8.5 and higher, (I think). The installer should be in the Apple Extras folder. On the Windows side, it's called Personal Web Server, and it's included with Windows 98. Consult Windows Help or World of Windows Networking for installation instructions.
If you want two-way access, you'll probably need to install FTP servers. For the Mac, NetPresenz is shareware that provides full-featured FTP and HTTP services. For the PC, Tucows has a list of FTP servers, some of which are freeware. They also have a list of HTTP servers.
You only need to run the servers on the server machines, i.e. the machines onto which you'll want to put files or from which you'll want to get files. For example, if I want to be able to get files from Sam and send files to his computer, then Sam's computer needs to be running the FTP server. If Sam needs to be able to do the reverse, then my computer also needs to be running a server.
Set up the access privileges according to the documentation that comes with each server program.
On the PC, I simply launch Internet Explorer or Netscape Navigator, and point it to the following URL:
http://192.168.0.5
To transfer files to and from the Mac, I make an FTP connection as follows:
ftp://192.168.0.5/
Note that Navigator has an integrated FTP client built in. Almost everyone has used it to download files from the Internet, but you can also use it upload files. You can either go to the File menu and choose Upload, or else drag and drop files from windows onto the Navigator window. Note that you must be currently logged into an FTP site with upload permissions in order to upload files.
Navigator's FTP client does have its limitations, though, so there are stand-alond FTP clients as well. For the Mac, Fetch is the standard client, and everyone loves the little running dog cursor:  For Windows 95, WS_FTP is becoming very popular, although it lacks a running dog cursor.
To check the basic connections and configurations, make sure you can ping every machine from every other machine.
If you have trouble logging in from the other end, make sure the initial login directory setting on the server is set correctly--it's not always obvious. If you want to check that the server is serving properly, try logging into it from an HTTP or FTP client running on the same machine. Watch the log on the server carefully. Even unsuccessful logins should show up.
Also, if you're using an FTP client, make sure there's a "/" at the end of the URL or IP address. For example, if:
ftp://192.168.1.2
doesn't work, try:
ftp://192.168.1.2/
If you can log in but you can't see or download any files, make sure that file sharing is enabled, and that appropriate permissions have been set. If you've enabled file sharing, but haven't enabled guest access, then everyone will need a password to log on.
Note also that you cannot have a dial-up connection running at the same time on a Mac, because you have to have TCP/IP set to Connect via Ethernet for this to work. Use the Configurations. . . item in the File menu to save your settings so you don't have to retype them when you switch between Ethernet and MacSLIP or PPP.
Note also also that this is one situation where Win9x does a better job, since you can have multiple TCP/IP connections--one via the NIC, one via the dial-up adapter. The use of the special, reserved IP addresses allows a program like Navigator to know that it needs to dial out to get to external addresses, but that pointing it to the internal server forces it to go thru Ethernet. That's the way we have it set up in our office. Our website is being tested internally via Ethernet, where it's being served off an old Mac. The Wintels can see it internally via the LAN, and get to the outside world via modem, all without rebooting or even changing any setting. Apple, are you listening?
Thanks to Thursby Systems, the makers of DAVE, for providing the information that enabled me to get this working. I downloaded a demo of DAVE 1.0, and they emailed me all this info on how to configure TCP/IP in a closed LAN. DAVE worked great, as advertised. As it turns out, though, once I had the TCP/IP stuff figured out, DAVE was more than I needed, so I ended up not buying the product. So by doing a good deed, Thursby ended up losing a sale. So I owe them one. Hopefully someone will buy DAVE as a result of having seen this, and thus restore my parking karma.
 Back to Steven's Home Page
Feedback? Corrections? Mail me @ steven@kan.org (Navigator users) or steven@kan.org (everyone else)
Last updated: 3/23/00
Thanks, and please come back soon!

