 , and under Control Panels, choose Monitors. You should see a dialog box like the following:
Changing color depth is possible if you have a monitor and/or video card capable of handling multiple color depths and resolutions. Most Windows PCs support at least a few different resolutions, and all Apples equipped with Apple Multiscan or other multi-sync monitors support different resolutions.
If you're using a Windows PC, you will probably have to restart Windows after you've selected a new resolution. If you're using a a PowerMac, you can switch on-the-fly. If you have an older Mac, but you're using a Multiscan monitor, you may need the latest version of the Display Software from Apple in order to switch on the fly.
If you're running Windows 95, then you probably know a heck of a lot more about your system than I do. Sorry!
If you're on a Sun or SGI computer, then you probably know way more about graphics and other geeky stuff than I will ever know, so I seriously doubt that you need my help with this.
 Macintosh, using the Control Panel
 Macintosh, using the Control Strip
 Windows 3.xx
 Windows 95
 Why Am I Doing This?
Click on the Apple Menu  , and under Control Panels, choose Monitors. You should see a dialog box like the following:
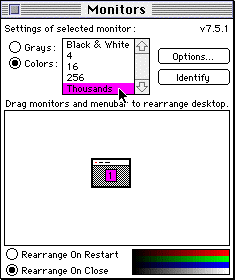 If the highlighted option already says Thousands or Millions, then you're already set correctly, and you can close the control panel. If your current setting is less than Thousands, keep reading. If there is an option for Thousands or Millions of colors, click on it and then close the control panel. Objects and windows on the screen should be re-drawn at the increased color depth.
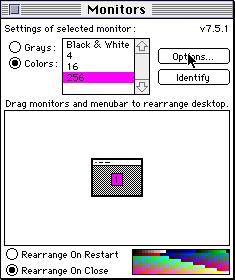 If you don't see an option for Thousands or Millions of colors, you may need to reduce your pixel count (resolution). Click on the Options button, as shown here:
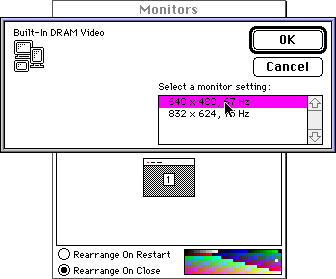 A dialog box should appear showing all the available screen resolutions and refresh rates available for your machine, with the current setting highlighted. Choose a resolution lower than your current setting, then click OK. Then choose Thousands or Millions of colors as described above, and close the control panel.
If you don't have the Control Strip, get it! It's included with the Display Software from Apple.
 If the Control Strip isn't showing, drag it out by the tab, or else click on the tab to extend it fully.

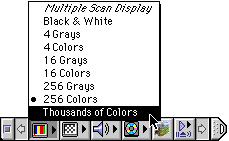 Check your current setting by clicking and holding the Monitor BitDepth button. Your current bit depth will be indicated by the bullet point. If the bullet point is next to Thousands or Millions of colors, you're already set correctly. If not, read on. If you see an option for Thousands or Millions, drag your cursor up to it and release the button. Everything on your screen should be redrawn at the increased bit depth.
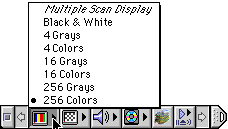 If you don't see an option for Thousands or Millions, then you need to reduce your screen resolution.
 Click and hold the Monitor Resolution button. and choose a lower resolution than your current setting (indicated by the bullet point). Your monitor will flash, and everything will be redrawn on the screen at the decreased resolution.
Now, change your bit depth as described above.
 From the Program Manager, find the Windows Setup icon in the Main Group. Double-click it to launch the Windows Setup utility. If you can't find the Windows Setup icon, you can also launch this program by choosing Run from the File menu, and typing WINSETUP.EXE in the Command Line.
 This dialog box should appear on your screen.
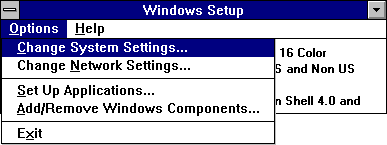 Click on the Options menu, as shown here and select Change System Settings.
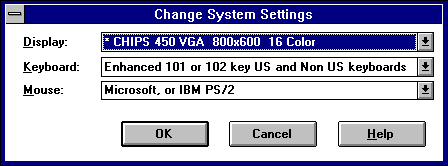 You'll get this dialog box with a drop-list for each option.
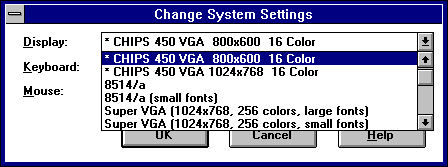 Click on the arrow next to the Display setting, and choose a resolution for your model of video card that allows for 65,536 or 32,768 colors, then click OK.
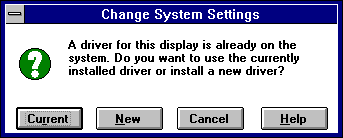 If you've used this setting before, you should get this dialog box. Usually, you should choose Current, unless you've received an updated version of the display driver.
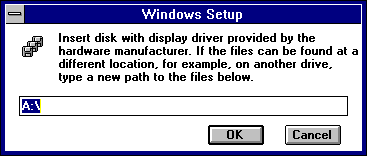 If you've never used this setting before, you may be prompted to insert a disk containing driver files for your monitor.
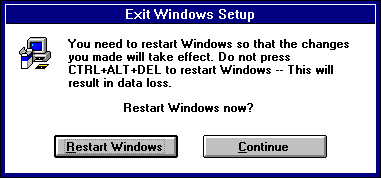 In either case, Windows will copy a few files and then give you this message. You can restart Windows right away, but if you want to finish some other stuff first, click Continue. You can then exit Windows Setup and continue working. The next time you start Windows, it should start with the new settings.
Don't ask me why it's so complicated on a Windows machine. On my Mac it's really easy! : )
Coming soon.
Each pixel on the screen is represented by data in video memory. Every time the computer wants to change what's displayed on your monitor, it sends new image data to the video memory. If you drag an icon around on the desktop, it takes the data representing that image and copies it into its new location when you drop the icon. Then it fills in the old location with data representing whatever was underneath the icon, or else the desktop pattern. (This is one reason it took so long to get good graphical user interfaces like the Macintosh operating system and Windows. It's a lot of work for the computer and requires a fairly fast processor.)
Meanwhile the computer's video circuitry is busy sending the contents of the video memory to the monitor 60-80 times per second (called the refresh rate). Every time the video circuitry refreshes the image, it takes the digital data from video memory and runs it through a digital-to-analog-converter (DAC) that changes the data for each pixel into varying voltage levels for red, green and blue. If you look at your monitor with a good magnifying glass, you'll see that the entire image is made up of dots or stripes of red, blue and green in varying intensities.
Computers have a fixed amount of video memory. On most machines this is special, very fast memory called Video RAM (VRAM), and on some machines this is just a dedicated portion of conventional system RAM (DRAM).
The amount of memory allocated to video determines the maximum number of pixels and the number of colors that the monitor can display. Typical pixel counts for monitors on a Macintosh are 640 x 480, 832 x 624, 1024 x 768, and 1280 x 1024. Typical pixel counts for monitors on a PC are 640 x 480, 800 x 600, 1024 x 768, and 1280 x 1024. A multi-sync monitor is capable of switching from one resolution to another. The higher the pixel count, or resolution, the more stuff you can display at the same time. Of course, the higher the resolution, the smaller a particular item will be. A QuickTime movie that's 320 x 240 pixels will take up a quarter of the screen at 640 x 480, but less than 1/16 of the screen at 1280 x 1024.
The number of bits assigned to each pixel (called the bit depth or color depth) determines the number of colors your monitor can display at that setting. If each pixel on the screen is represented by 8 bits of data, and a bit can have 2 values (0 or 1), then there are 2^8, or 256 different distinct colors (the palette) that can be displayed on the screen simultaneously. Imagine that you've got an 8-bit box of Crayola crayons that holds 256 different crayons. If you want to draw something with only a few distinct colors (like a spreadsheet or a desktop with icons) 256 crayons is probably enough.
If we double the bit-depth to 16 bits/pixel, the number of possible colors goes up to 2^16, or 65,536. (It's only 32,768 on a Mac. The 16th bit is used for a transparency mask, which determines whether or not a pixel is transparent.) This is called full-color, and is sufficient for most applications except photographic work. The highest bit-depth typically supported is 24 bit, or true-color. This provides over 16.7 million possible colors, and is used when photo-realistic imaging is necessary. That's one big box of crayons! (As a side note, 24-bit color actually uses 32-bits/pixel. The extra 8 bits are used for the alpha channel, which determines how translucent a pixel is).
For a given amount of video memory, there is a trade-off between bit-depth and monitor resolution. If a computer (such as my Macintosh Performa 6115) has a maximum of 600 K (1 K = 1024 bytes) of DRAM dedicated to video, it can support either 832 x 624 at 256 colors (832 x 624 x 1 byte/pixel = 507 K) or 640 x 480 at 32,768 colors (640 x 480 x 2 bytes/pixel = 600 K). If you have slots on your motherboard or video card for additional VRAM, adding VRAM increases the number of colors that your computer can display at a given resolution. If you've got DRAM-based video, you're probably stuck with what you've got.
For more information about upgrading your video performance, see my page on the Apple High Performance Video Card.
Why does any of this matter? Most people digitize pictures or video at bit depths of 16 or 24 bits/pixel. Many people, however, leave their monitors at 8 bits while they're working so that they can get the maximum resolution on their screen. When an application such as QuickTime wants to play a movie or show an image that was digitized at more than 256 colors, it tries to approximate the colors in the image with the closest colors it can. 256 crayons may seem like a lot, but imagine trying to draw a photo of the ocean and sky with lots of subtle color changes using the same box of crayons that you just used to draw that flashy Macintosh desktop with bold reds and greens. When you boot up, you start out with a system palette, which is analogous to the standard box of Crayolas. It's got a fair sampling of all the major colors, but not much refinement.
Since adjacent pixels in an image may have colors that are very similar, they get approximated by the same color when displayed. This results in blocky images or banding, where you poor transition from one color to another. A trick applications use is called dithering. Here, the application tries to sprinkle in pixels of varying color to try and achieve color blends that approximate the original colors in the image. If you don't have a purple crayon, and you're not allowed to actually mix colors within a pixel (You remember--Stay inside the lines!), you can sort of get purple by alternating red and blue every other pixel. Given the limited number of colors in the system palette, this can result in some funky-looking images with weird sprinkly effects.
To get around this, sometimes images or movies bring their own color palettes with them. Although the computer may still be limited to only 256 colors, the new palette specifies the best 256 colors for the picture or movie. To repeat the crayon analogy, your application now has access to every color Crayola ever made, but your box still holds only 256, so you pick the 256 that work best for whatever you're trying to draw. But you've got to use those same 256 colors to draw everything on the screen, including the desktop and the icons. That's why sometimes (when running GIFConvertor, for example) when you load a picture, everything on your screen changes colors and your icons become black and white. Your computer is using the 256 colors specified by the image for everything.
What about the speed tradeoff? You might think that using a lower bit depth would make a movie's frame rate faster, since the computer is moving less data around. Unfortunately, though, color reduction and dithering require computation, and computation takes time. You'll find that movies actually run faster at higher bit depths.
24 bit color data contains 8 bits each for red, blue and green, resulting in a possible 256 levels of intensity for each primary color. When a display is set to Thousands of colors, it allots 5 bits each for red, blue and green, resulting in a possible 32 levels for each primary color. If the computer reads 24 bit image data, it simply ignores the 3 least significant bits and uses the remaining 5. If the display is set to 256 colors, though, the computer has more work to do. If the movie or image brought its own color palette with it, then the computer uses a Color Lookup Table, or CLUT. Instead of using each bit to define a level of red, blue or green, each 8 bit number simply calls out the number of a color from the CLUT. Then the computer uses the colors from the CLUT to draw the image.
If there is no custom palette, then the computer has to dither the image. It uses an algorithm to decide which combination of colors from the default system palette will come closest to the colors in the actual image. It never really works very well. Here's an example of a picture and it's dithered cousin. (If your monitor is set to 256 colors right now, you won't see much of a difference):


Well, enough geek talk. To make things simple, just reduce your resolution and set your monitor for maximum color depth when you're viewing movies or photo-quality images. As a bonus, the images will appear larger on your screen since they're using proportionally more of the total screen area.
Was this informative? Additional questions? Is it correct? Please send me feedback or corrections by e-mailing me at steven@kan.org Thanks!
Rev: 5/18/96